Camera Information
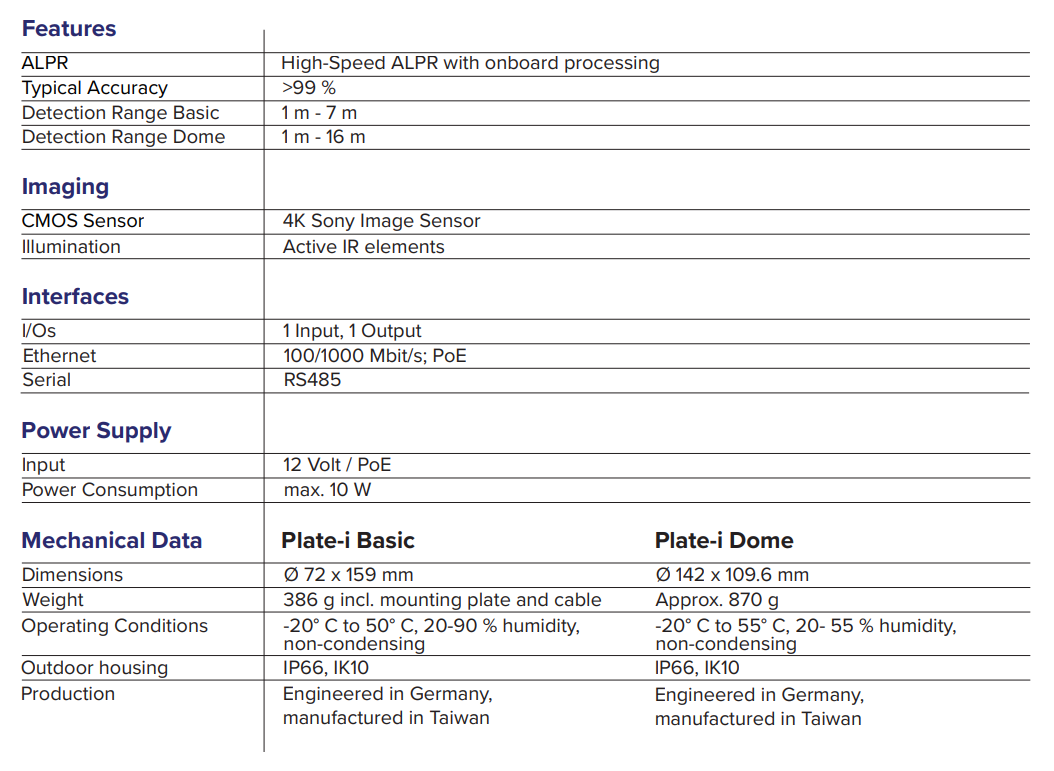
The CARRIDA Plate-i ALPR Camera is an affordable, standalone solution for automatic license plate recognition (ALPR), designed to support credentialed entry and audit applications. Equipped with a 4K Sony image sensor and on-sensor ALPR decoding, it ensures fast and efficient license plate recognition directly on the camera.
With plug-and-play capability and PoE+ support for both power and data, it’s easy to integrate into existing systems. Built to withstand harsh environments, the camera boasts an IP66 (IK10) waterproof rating and offers a manual zoom range from 1 to 7 meters (3 feet to 23 feet) for versatile installation.
Technical Data
Camera Configuration
The CARRIDA Plate-i ALPR Camera is configured using a Web Application, accessed via an Internet Browser. You’ll need to make sure the PC you are accessing the camera on is on the same network as the camera or you won’t be able to access the Web Application.
The below guides step through the entire process of getting the camera configured for use within netPark.
This guide takes content from the CARRIDA Plate-i Basic Quickstart Guide but the full guide can be viewed here: https://www.carrida-technologies.com/wp-content/uploads/2023/03/Carrida_Quick_Installation_Plate-i-Guide.pdf
Mounting the camera
The camera should be mounted at least 1 meter from the closest position where the vehicle is expected. A distance <1 m may work, but you will have to adjust camera settings in this case.
The Plate-i lens is chosen so that the resulting horizontal field of view is suitable for most access control applications. The typical operating range of the Plate-i camera is 1-5.5 m, the following table shows the horizontal field of view for different distances to the camera.
It is important to consider both the mounting height and viewing angle of the camera. If the camera is placed too high, or the horizontal/vertical angle is too big, the recognition accuracy may be reduced.
We recommend to consider the following guidelines:
Connecting the camera
To power up the camera, connect it to a PoE (Power over Ethernet) port on a local switch or router. Alternatively you can power the camera with a 12V DC power supply using the attached cable with the cinch connector.
Note: When powering up the camera, it can take up to 3 minutes until all settings are loaded.
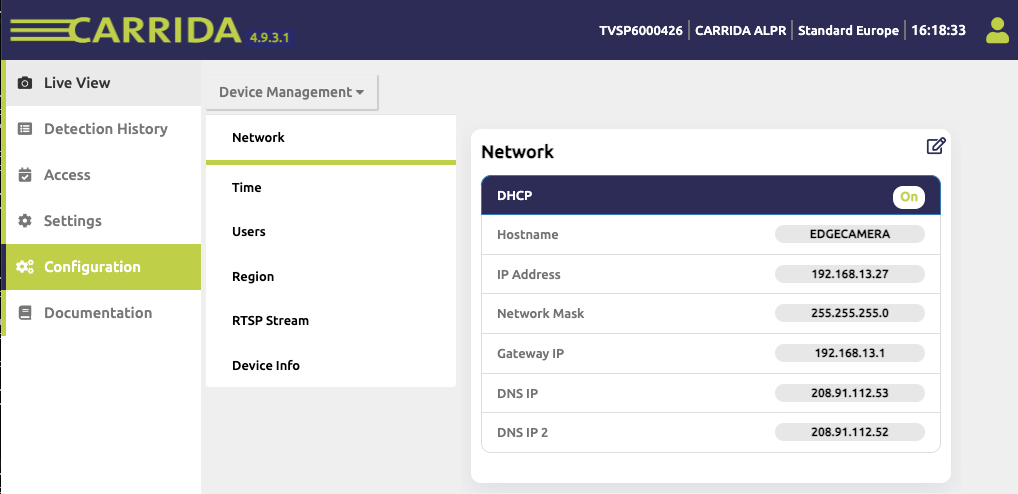
The camera is configured to use DHCP as factory default. Your local network needs to provide a DHCP server so that the camera will be assigned an IP address. After powering up the camera, the simplest way to detect it in your local network is to start the CARRIDA Camera Client Tool for Windows.
You can download it from here: https://carrida-technologies.com/download/tools/setup-cameraclient-1.0.1.zip
Plate-i will show up in the list of detected cameras as “Linux EDGECAMERA”, see the example shown in the screenshot above.
If you are running Linux, or you do not want to download and use the Camera Client Tool, you can scan your local network directly. For example on Mac OS, you can use the free LanScan software, or you can use the arp command line tool on Mac OS, Linux, and Windows, like arp -a, to detect all devices in your network.
Logging into the camera
Once you have detected the camera‘s IP address, you can begin to set it up properly. Open a browser and connect to the camera by typing its IP address. Preferrably use adminstrator credentials the first time you log into the camera:
- Default User Name: admin
- Default Password: secret
Note: We strongly recommend to change the admin password in the first session by going to “Configuration” and then “Users”.
Configuring the Camera Settings
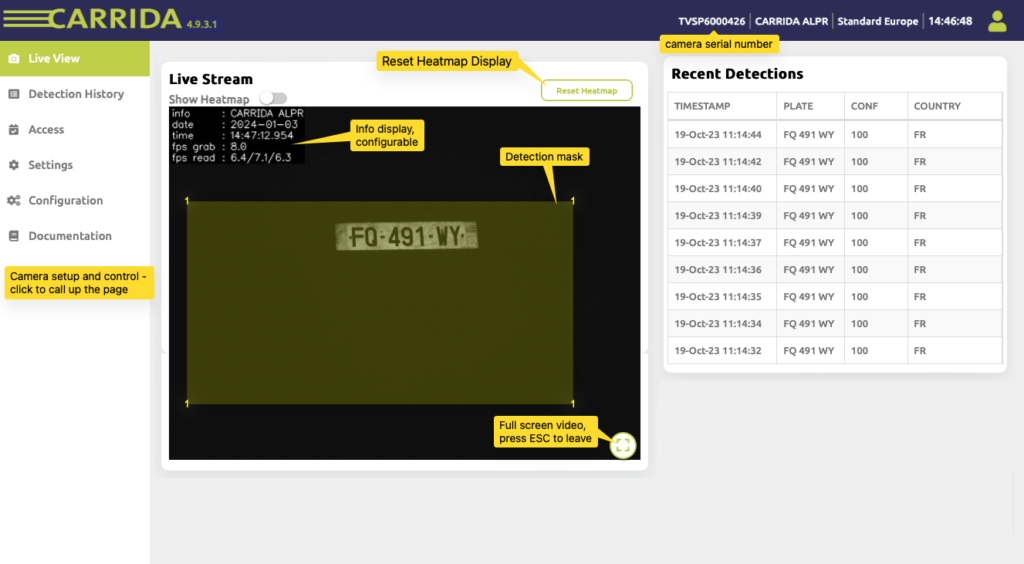
Once you are signed into the camera through the Web Application, you’ll see 6 different buttons on the left side of the screen, corresponding to different pages within the Web Application:
- Live View – This page will show a live view of the camera. This will show the detection area, as well as any Recent Detections
- Detection History – This page will show a history of plate detections, based on settings configured for the length of time the data will be stored for
- Access – This page is where you will configure the 2 different calls that the camera will use to communicate with netPark.
- Settings – This page allows you to modify the settings of the camera, with the main components being adjusting the ANPR Region of Interest (ROI) which is where the camera will look for a license plate and the adjusting the Brightness Control Region which defines the the area within which the camera measures and corrects the image brightness by adjusting exposure time and gain. You can also adjust if the LPR camera will capture images in color or grey scale.
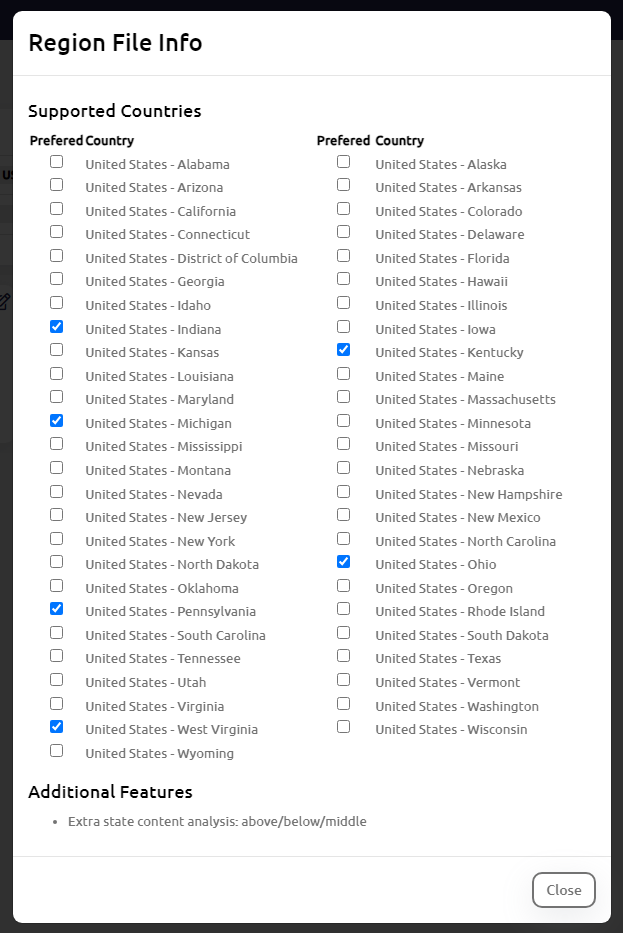
- Configuration – This page allows you to adjust the network settings of the camera, the time settings, users and the region. You can also set the preferred recognition of states surrounding the installation location. This allows you to tell the camera to “prioritize” specific states when decoding.
- Documentation – This contains the documentation for the camera. You can also reach the documentation using this link: https://www.carrida-technologies.com/doc/Plate-i/plate-i.html
Camera Configuration - Quick Setup Guide
Below is a quick guide to get a camera up and running quickly, with the rest of this page going into more detail about the camera and it’s configuration:
- Go into Detection History and set the “Lists Length” and “Hours Length” values to “1000”
- Go into Access > Actions and create the 2 Actions detailed in section Access Page Configuration below.
- Go into Settings > Engine and using the yellow polygon overlayed on the screen, adjust the position of the ALPR ROI area to where your license plates will be detected on the camera. Parking a vehicle in the lane where you expect most customers to be can assist with this. The area should be small enough to avoid additional “text” in sight of the camera but large enough to accommodate various types of vehicles. This may take a few tries to make sure you define the area properly but getting a rough setting now is important.
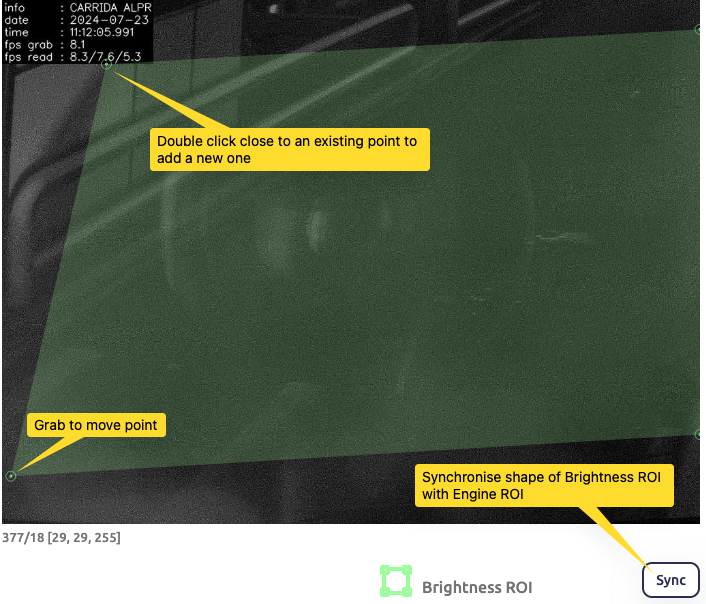
- Go into Settings > Camera and click on the Sync button next to the Brightness ROI label. This will make the green polygon on screen reshape itself to fit the ALPR ROI you set in Step 3. This may need to be adjusted overtime but this is a good initial practice.
- Go into Settings > Display Information and click into the Text Info field and assign a name to the camera; This will display in the top left corner and will be stored as part of the photos taken. Next click into the HUD Display Options and disable: Shutter, Gain, FPS Grab and FPS Read. This will limit the information displayed on the screen in the top left to only the Camera Name, Date and Time. You can also adjust the position of the HUD information by clicking into OSD Position and selecting a different corner.
- Go into Configuration > Time and set your the Date and Time, as well as your proper Time zone.
Live View Configuration
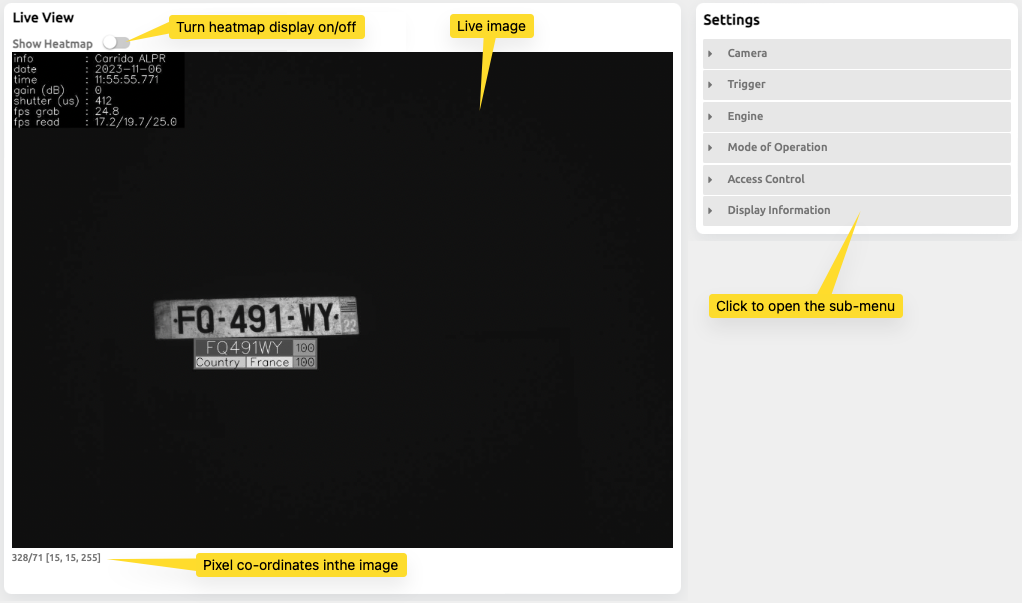
Nothing needs to be configured on the Live View page but it’s useful for debugging plate detections and you can use the Show Heatmap button to see an overlay on the camera showing where all of the reads for license plates have occurred. This can be beneficial for adjusting the ANPR Region of Interest (ROI) to make sure that the camera is searching for the plate in the areas where plates are actually being read.
Detection History Configuration
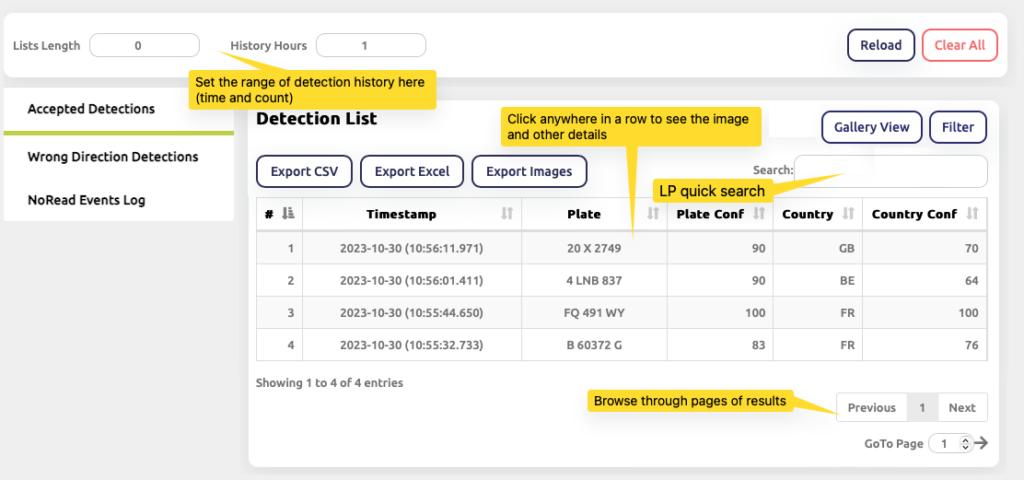
This page is mostly used for historical purposes but it does keep a running record of the most recent detections. Data is sent from the camera to netPark immediately and these historical records are never referenced by netPark but they can be beneficial for debugging when setting up a new camera.
In the top left corner, you’ll need to set the “Lists Length” and “History Hours” values to keep data stored within this table. netPark recommends the following:
- Lists Length: 1000
- History Hours: 1000
Access Page Configuration
This page is where you will configure the 2 Actions that will allow the CARRIDA Plate-i camera to pass over ALPR data and the 2 ALPR images to the netPark system.
Configuring Camera(s) in netPark
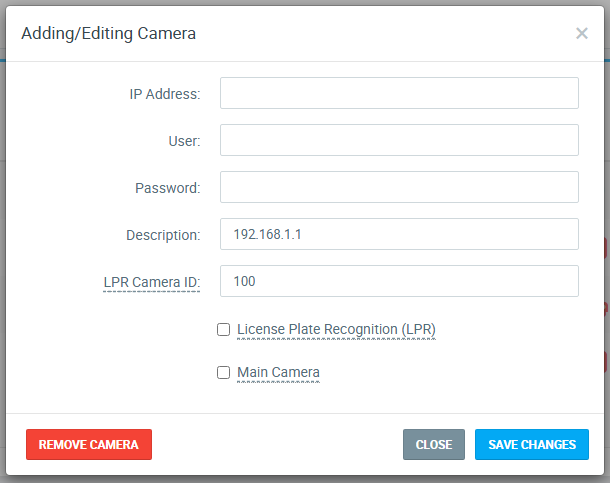
Prior to configuring the cameras access settings, make sure to configure the cameras themselves under Self Park > Cameras > Click the Camera within the lane you want to configure > LPR Camera ID. You’ll want to assign a Description (netPark Recommends assigning the camera’s IP address for quick reference) and assign an LPR Camera ID. You will need to reference this ID in the steps below.
LPR Data Action Configuration
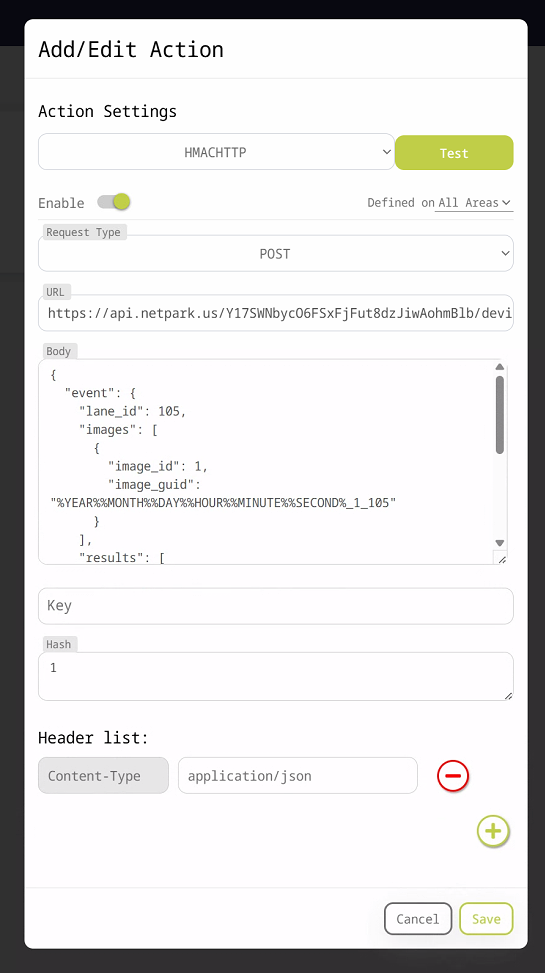
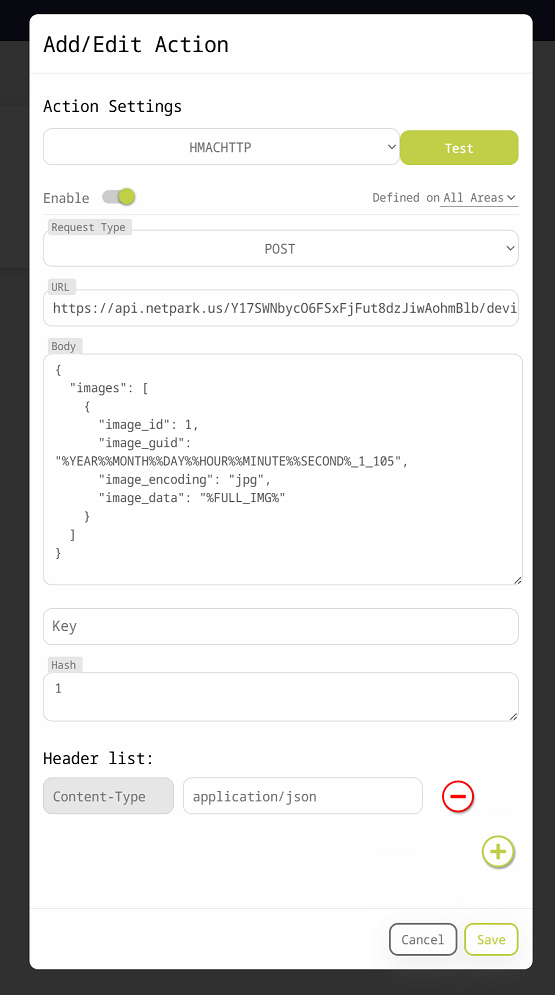
Click into the Actions tab and then click on Define New Action at the top of the page. A pop-up will appear with Add/Edit Action at the top and you’ll set the following values:
- Event Type: Read
- Action Settings: HMACHTTP
- Request Type: POST
- URL: https://api.netpark.us/[LOCATION API KEY GOES HERE]/devices/lpr/event
- The API key can be accessed under Maintenance > Access & Integrations > netPark LPR. A netPark associate will need to generate the API key for your facility.
- Body – The Lane ID will correspond to the Lane ID configured under Self Park > Cameras > LPR Camera ID.
- Copy the code snippet below and paste it into the Body section:
					{
  "event": {
    "lane_id": [LPR CAMERA ID],
    "images": [
      {
        "image_id": 1,
        "image_guid": "%YEAR%%MONTH%%DAY%%HOUR%%MINUTE%%SECOND%_1_[LPR CAMERA ID]"
      }
    ],
    "results": [
      {
        "plate_read": "%LP%",
        "plate_read_confidence": "%CONF%",
        "plate_state": "%STATE%",
        "plate_state_confidence": "%CONF_STATE%",
        "plate_image_guid": "%YEAR%%MONTH%%DAY%%HOUR%%MINUTE%%SECOND%_1_[LPR CAMERA ID]"
      }
    ]
  }
}
- Key: Blank
- Hash: 1
- Header List:
- Entry Key: Content-Type
- Entry Value: application/json
LPR Images Action Configuration
Click into the Actions tab and then click on Define New Action at the top of the page. A pop-up will appear with Add/Edit Action at the top and you’ll set the following values:
- Event Type: Read
- Action Settings: HMACHTTP
- Request Type: POST
- URL: https://api.netpark.us/[LOCATION API KEY GOES HERE]/devices/lpr/upload
- The API key can be accessed under Maintenance > Access & Integrations > netPark LPR. A netPark associate will need to generate the API key for your facility.
- Body – The Lane ID will correspond to the Lane ID configured under Maintenance > Self Park > Cameras > LPR Camera ID. Copy the code snippet below and paste it into the Body section:
					{
  "images": [
    {
      "image_id": 1,
      "image_guid": "%YEAR%%MONTH%%DAY%%HOUR%%MINUTE%%SECOND%_1_[LPR CAMERA ID]",
      "image_encoding": "jpg",
      "image_data": "%FULL_IMG%"
    }
  ]
}
- Key: Blank
- Hash: 1
- Header List:
- Entry Key: Content-Type
- Entry Value: application/json
Settings Page Configuration
The settings page allows you to modify different settings on the camera but the main 2 areas we are concerned with are: Camera and Engine, as these are the two areas where we can modify the Brightness Control Region and the ANPR Region of Interest (ROI).
Brightness Control Region Adjustments
The area inside the green polygon in the live image is called the brightness control region. It defines the area within which the camera measures and corrects the image brightness by adjusting exposure time and gain.
It is recommended to limit the brightness control area to the actual image region where license plates are expected to be visible. This maximizes the effect of the control parameters and allows the camera to achieve the best image quality in all possible scenarios.
Adjusting the Brightness Control Polygon
The shape and size of the polygon for brightness control can be easily modified. The Brightness ROI should ideally only cover image areas where you expect license plates:
- Click, drag and release a corner of the polygon to move it.
- Add corner points by double-clicking near an existing corner point. The newly created point can then be dragged to its new location.
- Delete an existing corner point by moving the mouse over it and right click.
- Move the entire polygon by pressing ctrl on the keyboard and dragging a corner with the mouse. This moves the whole polygon.
ANPR Region Of Interest Adjustments
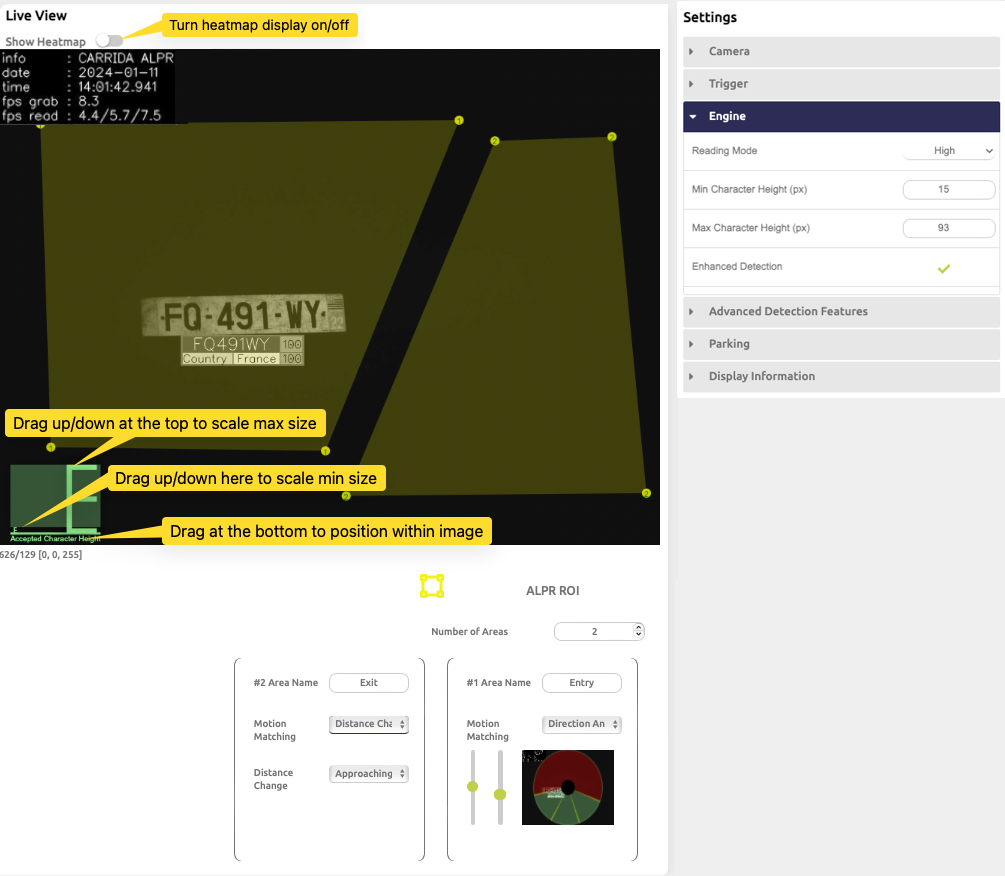
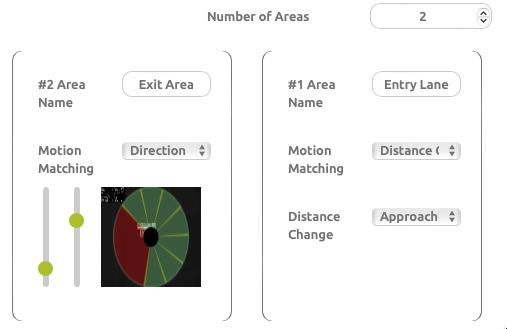
The ANPR Region of Interest (ROI) is the yellow polygon superimposed on the camera image, it defines the image region were the actual reading takes place. Note that several disjoint ROIs may be defined in an image, e.g. you can define a polygon for an exit area, and a polygon for an entry area in the image.
For each ROI a direction and direction range of motion, or a distance change qualifier can be defined to filter LPs according to their motion – this is explained in Section ANPR Region Of Interest with Direction below.
A ROI polygon can have an arbitrary number of contour points, but it must contain at least 3 points.
Adjusting the ANPR ROI Polygon
The shape and size of the polygon for ANPR ROI can be easily modified. The ANPR ROI should ideally only cover image areas where you expect license plates:
- Click, drag and release a corner of the polygon to move it.
- Add corner points by double-clicking near an existing corner point. The newly created point can then be dragged to its new location.
- Delete an existing corner point by moving the mouse over it and right click.
- Move the entire polygon by pressing ctrl on the keyboard and dragging a corner with the mouse. This moves the whole polygon.
ANPR Region Of Interest with Direction
An region of interest may be combined with a motion filter so that license plates are only accepted if they move in certain directions.
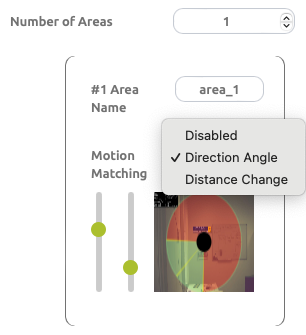
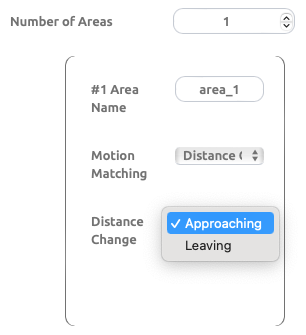
You can choose the type of motion filter with the pull down dialog next to Motion Matching:
- Disabled – No motion filtering is used. Any license plate within the area is accepted.
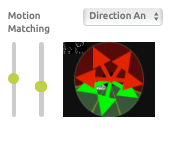
- Direction Angle – A license plate must move in a defined direction in order to be accepted. Directions are visualized as green/red sectors – green sections mark the accepted driving direction, red sections define invalid directions. In the example on the right, a direction from right to left bottom with an angle range of approx. 140 degrees is defined as green. The colored arrows in the image show examples for which motion directions would be accepted (green) or rejected in this case (red).
- Distance Change – A license plate must either approach the camera, or leave the camera in order to be accepted. The direction estimation is based on the measured size change of the license plate between two detections. Note that for license plates in greater distance to the camera, this measurement may not be very accurate.
Note that you can turn on the Heatmap feature on this page to support you in adjusting the engine ROIs.
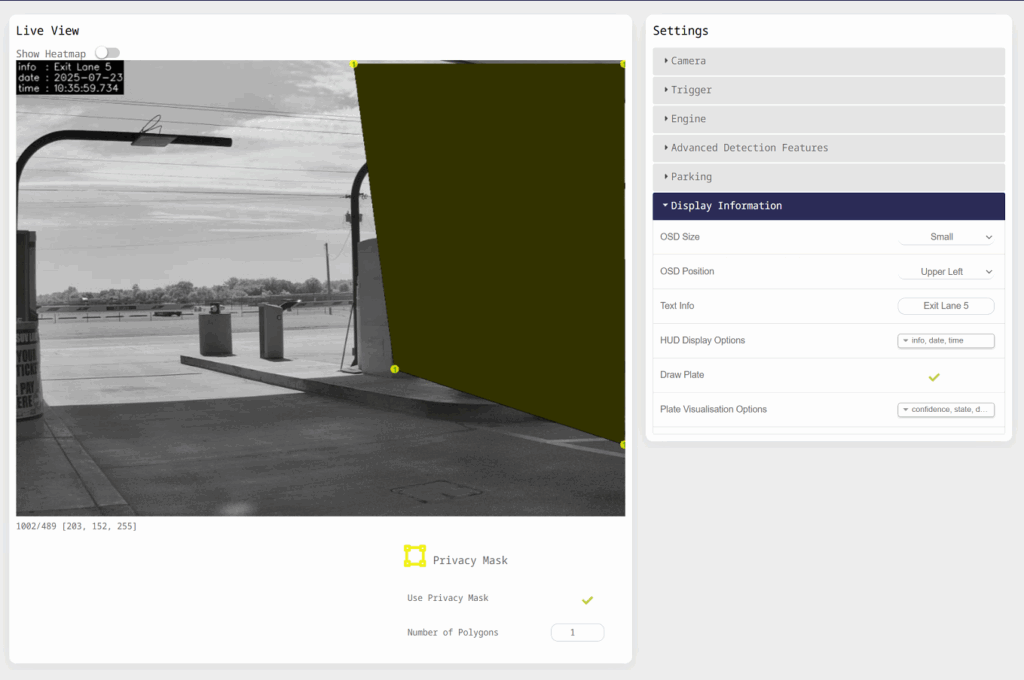
Setting a Privacy Mask
Click into the Display Information section and then click on the “Use Privacy Mask” option at the bottom; This will turn the red line into a green checkmark.
A black box will appear on the screen and you can then use the 4 corners of the box to drag the box around to different areas of the screen. Once you click off of the box, the system will load and a blacked out box will appear on the camera image display; See example image of this in use to the right.
If you need to add additional boxes, click in the “Number of Polygons” section and increase the amount to be whatever you need. netPark recommends doing 1 box at a time, to avoid issues with overlapping boxes and making it difficult to drag the points around.
Configuration Page Configuration
The Configuration page allows you to maintain the camera, adjust network and time settings and upgrade the CARRIDA firmware and region files.
Device Management – With the Device Management pull down menu you can to perform basic maintenance functions as administrator or superuser. Regular users do not have access to this dialog.
Basic features that users may need to adjust include:
- Reboot System- This option completely reboots the edge device. This is equivalent to a cold start of the device.
- Shutdown System – In case that you need to power down the device, we recommend to shut it down using this action and then disconnect it from the power supply.
- Download Logs – All camera logs can be downloaded by clicking on the Download logs button. The log files will be collected and compressed into a file name logs.zip and downloaded to the default download location of your browser.
- Save Configuration – The complete set of camera configuration parameters can be exported and stored on your PC with this button. This feature may be useful in order to make a backup of the CARRIDA configuration, or even to transfer the settings to another camera. The configuration file will be stored at the default download location of your browser.
- Import Configuration – The state of a camera can be restored by importing a previously saved configuration file using this system action. It is possible to import configuration settings from another camera – this may be useful when you want to quickly copy and distribute camera setups. For best compatibility, we recommend that you exchange only configuration files of the same firmware versions.
- Update Software – Plate-i may provide a software update for your camera as an update package which can be installed using this menu. Select an update package by choosing an update package and then proceed with the update process by pressing “Start”. Note that the SW update will normally not modify your camera configuration.
- Factory Reset – This option is used to reverse the camera configuration back to factory settings. This should only be used at the urging of a netPark Associate.
Time – The Time menu allows you to setup time on the camera. When opened, the menu page gives you an overview of the current setup. The local time as well as timezone can be set manually (NTP off), or the NTP protocol can be used to synchronize the camera with time servers in your local network, or the internet with default or user selectable time servers.
Users (User Management) – Plate-i allows you to manage a number of user profiles which are differentiated by the level of access to configuration and system settings on the camera. It is highly recommended to change the default password for the super user immediately during setup of the camera.

