Facilities may want the ability to monitor their inventory in real-time and relay it to their customers for informational purposes. That is where Digital Inventory Signage comes into play. Digital Inventory Signage allows netPark to communicate with specific digital signage to display inventory counts or if requested, an “Open” message until the Inventory hit’s a specific threshold and then netPark will begin showing specific inventory numbers. The inventory is auto calculated based on the “Automated Count” of the lot, which is based on Loop Activation, allowing for what should be a more real-time inventory total, even if stale tickets exist in the system.
This article will talk about the process of configuring digital signage, what needs to be purchased and provide helpful wiring information for installers.
Hardware Requirements
Setting up inventory signage isn’t difficult but it does require some specific hardware for your facility for it to function the most effectively.
Property Infrastructure
Because the the inventory signage utilizes “Automated Inventory Counts” to display inventory, it’s EXTREMELY important that all Entry and Exit lanes have both a Presence and a Safety loop that are in proper working order. netPark utilizes both loops to monitor the direction a vehicle is traveling and to get the most accurate numbers possible, you will need both Presence and Safety for all lanes.
Additionally, if a facility has shuttles, it will be vital that the shuttles are either tied into an existing AVI/RFID/LPR system for tracking their gate vends — Otherwise the shuttle constant in and out will trigger “Illegal Entry/Exits” that will effect the inventory. It utilizing “clickers” for vending the gates for shuttles, that mechanism will need to be tied into netPark as an “Access Pulse” or the same situation will arise as detailed above.
Required New Hardware
Once loops and shuttle setup, if applicable, has been confirmed, you will need the following equipment for digital inventory sign that you are displaying:
- ADAM 4571 Module
- Signal-Tech Digital Sign (Model #42019)
ADAM 4571 Configuration
Creating a New Lane & Device
netPark utilizes “lanes” within the system for every piece of equipment communicating with netPark. Even though the digital signage likely won’t be linked to a specific lane, we will still need to create one within netPark.
Below are the steps to create the lane within the system:
- Click on Self Park on the left side of the screen
- Click on Add New Device in the bottom right corner.
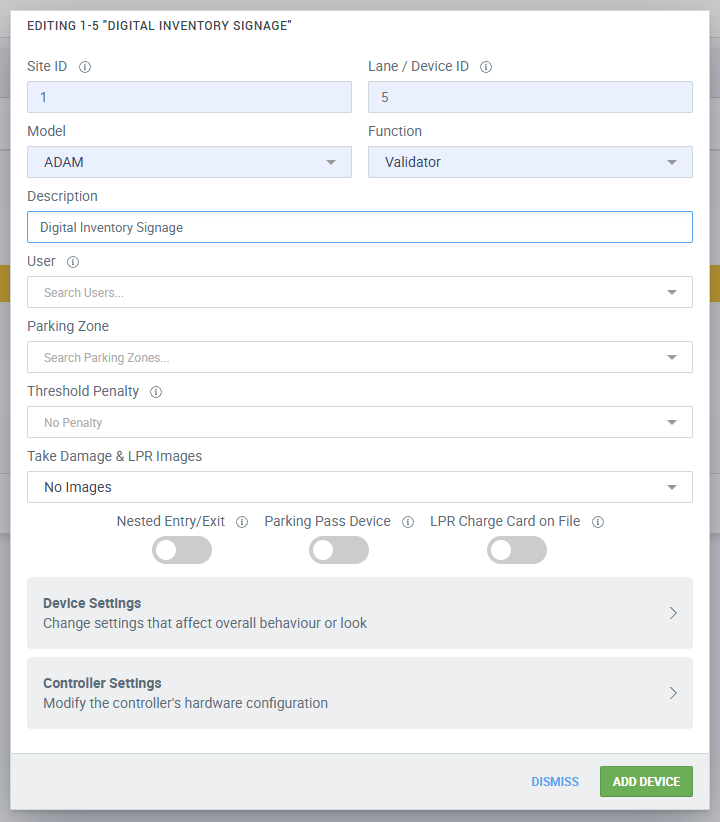
- A pop-up will appear (See to the right) where you will configure the new Device and Lane. You’ll want to set the following options:
- Site ID – Leave Default
- Lane / Device ID – Set this to a Lane Number not currently in use at your facility.
- Model – ADAM
- Function – Validator
- Description – Digital Inventory Signage or whatever name you want to be displayed for the lane in netPark
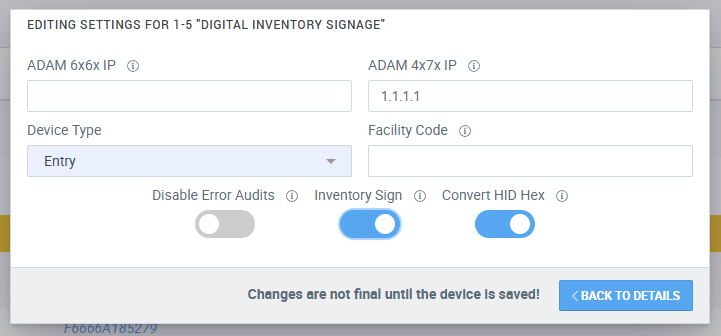
- Once the above is filled out, click on Device Settings and set the following parameters:
- A. ADAM 4x7x IP – You’ll enter the IP Address assigned to the ADAM 4571 here
- B. Inventory Sign – Toggle On
- 5. Once both variables are set, hit Back to Details and then hit the green Add Device button in the bottom right corner.
You will complete the above process for each digital sign being added to the facility.
Configuring the Sign Inventory Open Threshold Setting
By default, netPark calculates available inventory by subtracting the Automated Inventory (found under Inventory > Statistics) from the Location Inventory (found under Maintenance > Locations).
However, if you prefer for the sign to display “OPEN” until inventory reaches a specific threshold, you can configure this behavior by adjusting the Sign Inventory Open Threshold setting. This setting tells the system to continue displaying “OPEN” until the available inventory drops below your specified threshold.
You can configure this setting by navigating to:
- Maintenance > System Settings > Self Park > Sign Inventory Open Threshold
Manually Correcting Automated Inventory
It is good practice to perform lot audits and count your number of occupied spaces on a nightly basis. In the event that your audit reveals that the calculated Automated Inventory is off, you can manually set the count within netPark under Inventory > Statistics.
Within this screen, you can click in the “Add Manual Count” field and manually set the Automated Inventory to this value.


Signal-Tech Digital Signage Wiring
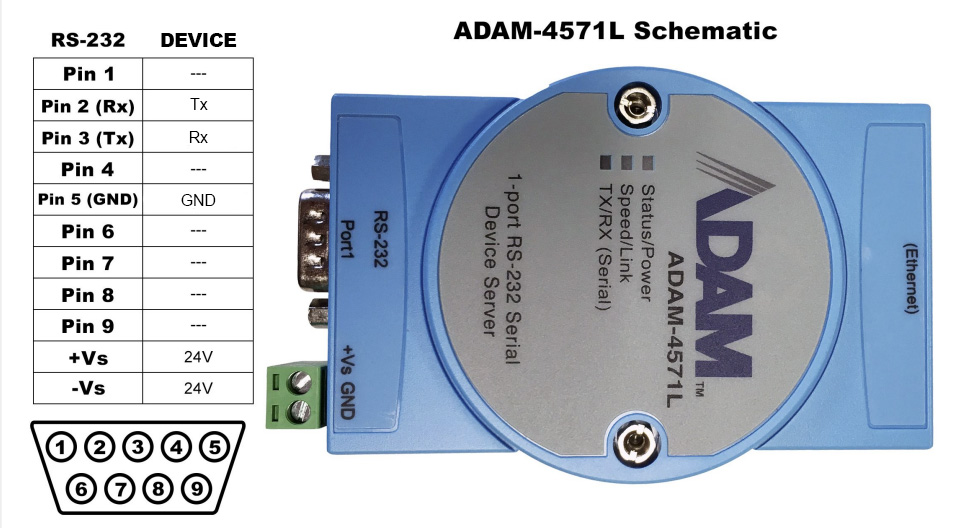
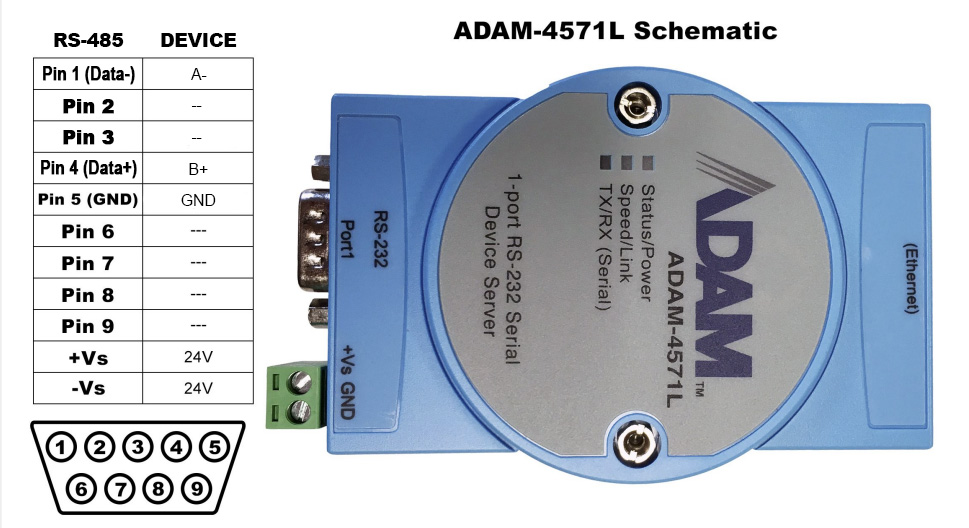
The Signal-Tech Digital Signage can communicate with both RS-485 and RS-232. There are 2 different ports on the back of the unit and below are the proper pin-outs to the ADAM 4571, separated by type:
- RS-232 (Digital Signage > ADAM 4571)
- TX > Pin 2
- RX > Pin 3
- GND > Pin 5
- RS-485 (Digital Signage > ADAM 4571)
- A- > Pin 1
- B+ > Pin 4
- GND > Pin 5
Below is a link to the PDF document for the Signal-Tech Digital Sign.
Download Link: Click Here
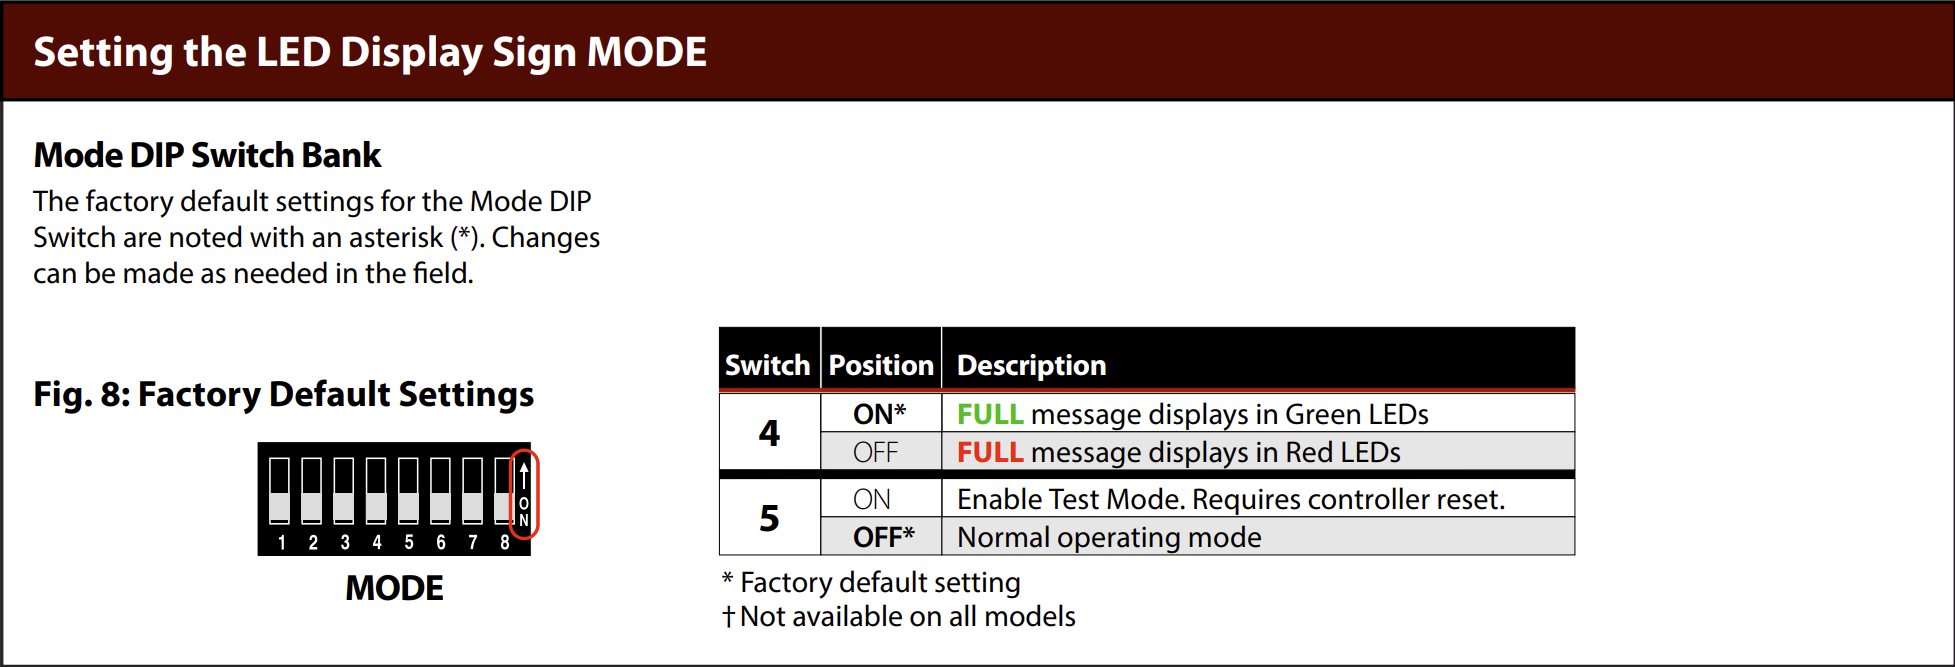
Signal-Tech Digital Signage Settings - DIP Switches
Once the sign is wired up to the ADAM 4571, you’ll want to make sure that you set all of the “DIP Switches” on the back of the sign into the Down or “Off” position.