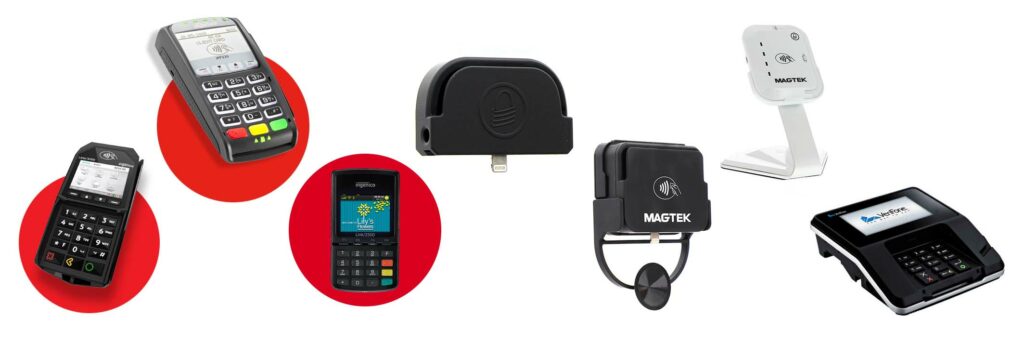
netPark Pay supports several encrypted Chip & Pin (EMV) credit card readers. These readers all support the ability to charge MagStripe, Chip, or NFC Contactless (Apple Pay & Google Pay) cards, as well as the ability to manually key in cards as needed. Ingenico and Verifone EMV readers require an active Internet connection. We also support readers that can be connected to iPhones via Bluetooth and/or a direct connection.

Support Devices
- Verifone MX915
- Ingenico iPP320
- Ingenico Lane 3000
- Ingenico iUC285 (Self Park/Unattended Reader)
- tDynamo (iPhone – Bluetooth)
- iDynamo Gen II (iPhone – Lightning connector – Stripe only)
- iDynamo 6 (iPhone – Lightning connector – EMV/Swipe/Contactless)
Starting a Reader
Before a reader can be used it needs to be activated. Please follow the Setup & Configuration section below to setup a reader. Once your reader has been setup and configured it’ll be available for use in any credit card form throughout the netPark system. The credit card forms will have a “Cloud Terminals” dropdown, from which you can select the Terminal to use for the transaction.
Canceling a Transaction
A transaction that has been initialized on the EMV reader has to be canceled by the user at the EMV device. For this reason it is best to only start the EMV reader once the amount the charge has been confirmed as any adjustments to the amount after the fact may delay the checkout process.
Setup & Configuration
The Verifone and Ingenico readers need an active Internet connection to be used in netPark. Throughout netPark these readers are referred to as cloud terminals since they work through the Internet connection. Please refer to our System, Hardware, and Network Requirements article for the required outbound URLs and ports needed for these devices.

Setting up a Verifone MX915
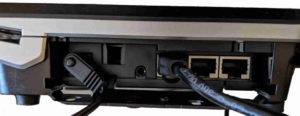
To setup this device, plug in power and connect an Ethernet cord into the Ethernet port closest to the power. Once the device powers on, it should display an Activation Code. Follow the instructions in “Activating a Reader” below to activate in the netPark Portal.

Setting up an Ingenico iPP320 or Lane 3000
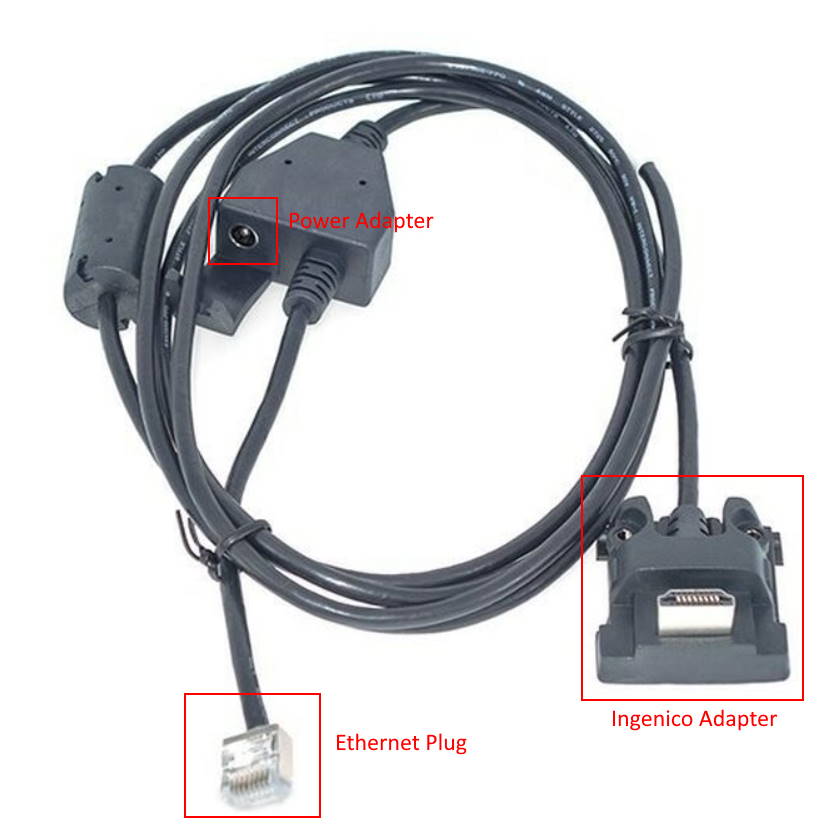
Both the Ingenico iPP320 and Lane 3000 devices use the same kind of cable for their connection. The cable has a splitter that a power adapter can be plugged into on one side and has an Ethernet plug coming out of the other. The Ethernet plug needs to be connected to a switch, while the adapter should be plugged into a outlet. The HDMI-esque adapter on the opposite end is plugged into the bottom of the Ingenico reader. Once the device powers on, it should display an Activation code. Follow the instructions in “Activating a Reader” below to activate in the netPark Portal.
Setting up an Ingenico iUC285
The iUC285 is an unattended (Self Park) EMV device that needs to be setup by interacting with the physical self park equipment. Please follow this article to replace an existing, netPark Pay iUC285 reader, or this article to setup an entire device from scratch.
Activating a Reader

![]()
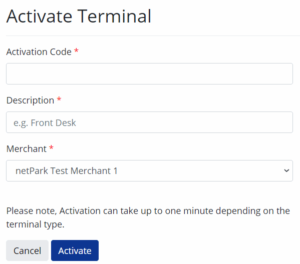
Verifone and Ingenico EMV readers need to be activated before they can be used. Once they are powered on and connected to the Internet they will present Activation Code. Follow these steps to activate the reader:
- Login to your netPark Pay Merchant Portal
- Click on Terminals -> Activate Terminals
- Enter Terminal Details (Description is what shows in the dropdowns in the netPark)
- Click “Activate”
- After 30-60 seconds your EMV reader should reboot and activate
Deactivating/Removing a Reader
It should not be necessary to remove readers very often. However, if a reader goes bad you’ll want to remove it from your active devices list. This process details how to do so via the Merchant Portal:
- Login to your netPark Pay Merchant Portal
- Click on Terminals -> View Terminals
- Click on the Terminal ID of the terminal you wish to remove
- In the Merchants table, click on “Edit”
- Click the “Remove” button
Manual Key Entry
The Ingenico iPP320/Lane 3000 and Verifone readers support manually keying in cards as needed. If the customer’s card is present you should always have them use the reader. This will provide better rates and extra protections against chargebacks. However, there may be times when you need to collect the card number manually. Cases such as the customer is providing their card over the phone or the card is too damaged to be reader via EMV or Swipe.
To enter a card manually, begin the process of charging or storing a card via the regular activation process in netPark. Once the reader is prompting for you to Insert/Tap/Swipe card you can initiate a manual entry.
Verifone readers: Hit the red “X” button – this will “Cancel” the transaction and prompt for a manual entry. Hit the red “X” button again to cancel the whole transaction.
Ingenico readers: Hit the F1 or 1 button to initialize – there should be a prompt on the screen over the button to press on the reader.
Common Troubleshooting Issues
- “Network Parameters” – This issue comes from being unable to connect to the local network. Verify that the Ethernet cable is in the Ethernet port closest to the power.
- “No connection” – This issue typically stems from the reader being unable to communicate with the external server. Please verify that you have an Internet connection. Make sure the appropriate Network Firewall Rules are in place.
- Activation Code Invalid/Expired – Activation codes are only good for a few minutes at a time. If you encounter this, verify that the EMV reader is still displaying the same code you are entering. If this is still an issue, reboot the reader and try with the new code.
- Pin Pad Error – This error typically shows in netPark when attempting to initialize a transaction. The most common reason for this error is that the EMV reader has gotten into a bad state. Power-cycling the reader (pulling it’s power connection) usually resolves the with no additional work needed.
- NAK Error – This error typically only presents for the iUC285 Unattended Reader. This indicates that the Datacap TranCloud server was unable to communicate with the iUC285 to start a transaction. Verify the cables between the two are firmly connected and power-cycle the iUC285.
