The Condo Management System provides an easy to use method to allow condo owners and management companies the ability to manage their available parking spaces for guests staying at their condos, utilizing our Parking Pass System. The system is configured to allow you to manage Units, Individual Owner-Operators and Management Companies, as well as provide access to various personnel who should have the ability to manage these properties. Groups and Companies will have individual Accounts associated with them that allow those individuals to login the website interface and create Parking Passes for their guests, who then have the ability to login to the website themselves and pay for their parking.
This guide provides a quick guide on how to setup and manage the backend system powering the Condo Management System.
Creating and Managing Groups & Companies
The first step of setting up a new condo for use with the Condo Management System is to create the Group or Company that will be managing the unit. No matter if the condo is owned by a single person or a management company, a Group or Company still must be created.
Below is a guide on how to create and/or manage a Group or Company:
- Via the Navigation Panel, click on Accounts
- Using the different tabs at the top of the page, click on Groups & Companies and then click the green + New Group/Company button in the top right of the screen
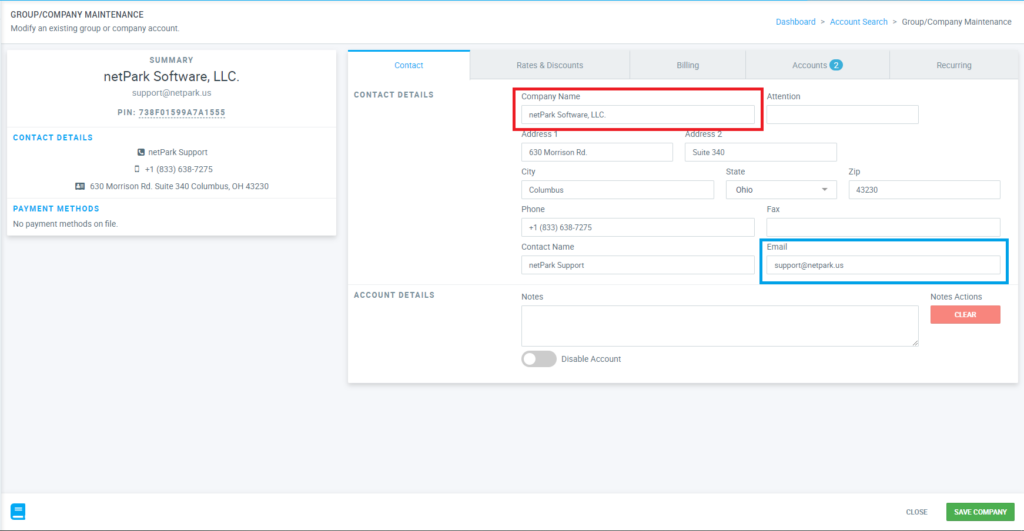
- Once on the page, the most important information that you need to fill out is the Company Name (See red box in the photo on the right), as that is how we associate the unit to the company in the next step. If there is additional information you would like to enter into the fields available for tracking purposes, you can do so but it isn’t a requirement for the system to work.
- Special Note: The Email (See blue box in the photo on the right) on the Company profile CANNOT be used to log in to the website management system; It is there only as a reference and an actual customer account (Detailed below) needs to be associated with the company in order to log in to the website.
- Once you have filled out the required information, click on the green Save Company button in the bottom right of the screen
Creating Condo Units & Associating Companies
Once you have created your company, you’ll need to create the condo unit and associated the company with that unit, as well as setting the number of parking spaces that should be associated with that unit in the system.
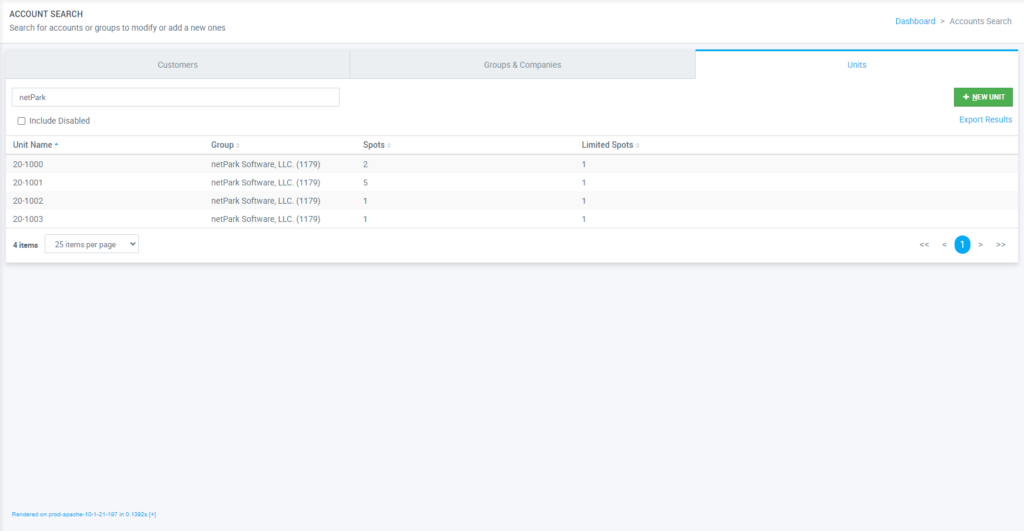
This screen allows you to see all currently entered Units in the system, search for specific units and add/edit units.
Below is a guide on how to create the condo unit, associated the company with the unit and assign the number of parking spaces:
- Via the Navigation Panel, click on Accounts
- Using the different tabs at the top of the page, click on Units and then click the green + New Unit button in the top right of the screen
- A pop-up labeled Adding New Unit will appear on the screen with various fields to fill out:
- Unit: This is the unit number that you are setting up
- Company: This is where you will associate the company you created in the previous step (Or another existing company) with this unit
- Spots: This is the total number of parking spaces available to the unit and will dictate how many Parking Passes the company can have active at any given time-frame
- Limited Spots: This is the total number of parking spaces available to this unit during High Capacity based on Parking Pass Rules
- Once you have entered all the required information, click on the green Save button in the bottom right corner.
Creating Customer Accounts & Associating to Companies
Customer accounts are the individual accounts that owners and management company employees will use in order to log into the website modules in order to setup and manage their Parking Passes for their Units.
Customer accounts must be linked to the company associated with the unit in order to manage Parking Passes for that Unit. Customers will use the email associated with their customer account to log in to the website modules.
Below is a quick guide on creating a new customer account and associating that account with the company you associated with the unit in the previous step:
- Using the different tabs at the top of the page, make sure you are on Customers and then click the green + New Customer in the top right hand corner of the screen.
- Using the tabs at the top of the page, navigate through the different sub-sections:
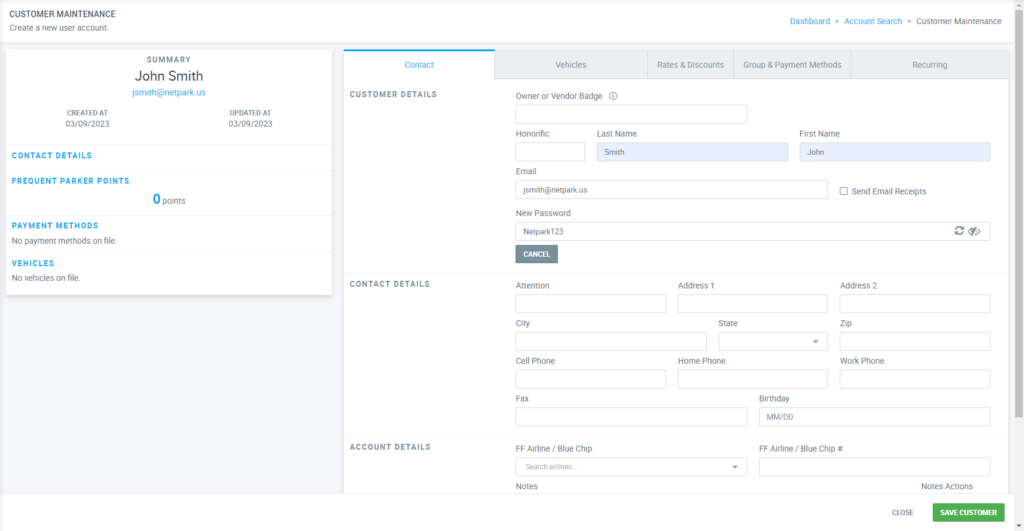
- Contact: Make sure to fill in the Last Name, First Name, Email and if you’d like, assign the customer a password using the Set Password button; Additional information can be filled in but isn’t required to make the system function.
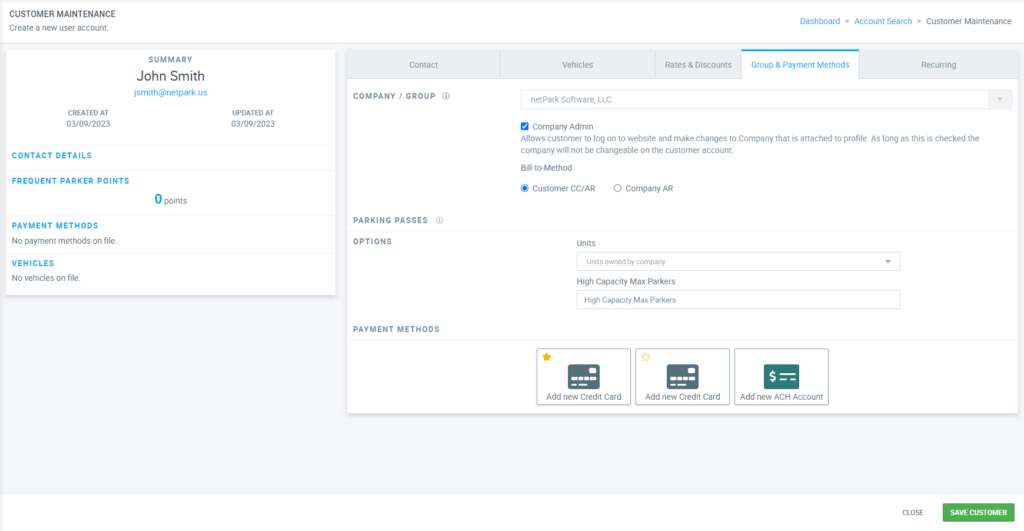
- Group & Payment Methods: Via the Company / Group search field, search for and click on the company you setup in the previous steps (Or an existing company) and then make sure to check the Company Admin box below the field
- Once you have configured the above fields, click the green Save button in the bottom right corner of the screen


