The Hamilton Parking Entry/Exit Terminal (PEET) is the primary device in a self park installation. The purpose of this device is to allow your customers to enter your lot by pulling a ticket or by scanning a credential. A credential can be an employee badge, a loyalty card, a reservation or a parking pass. Before you begin setting up your PEET device, you’ll need to have a few things:
Lane number – This is defined within netPark on the Self Park screen and is typically setup by netPark
Facility Code – If using RFID Prox reference the facility code on the cards from your provider
NIM IP – Provided by the IT team at your location to netPark. Once we have configured and shipped the NIM we can provide this IP upon request.
Router/Gateway IP – Provided by the IT team at your location
Subnet mask – Provided by the IT team at your location
Controller IP – Provided by the IT team at your location (should be unique for each device)
Please note: The NIM IP, Gateway IP, Subnet Mask and Controller IP should all be provided by your IT team. netPark does not run or manage networks and cannot provide these details.
Setup device in netPark
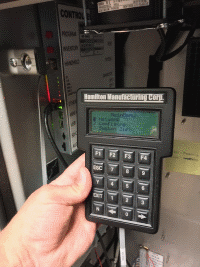
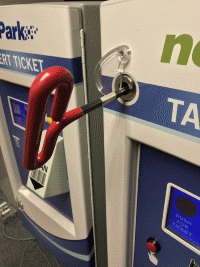
The first step in configuring a PEET device is to get setup all devices in netPark. This allows us to clearly id each device and makes it easier to manage the lot. To begin, navigate to the Self Park screen in netPark and click the “Add New” button. A window will popup with some questions about the device you are configuring. With this being a PEET device you’ll want to select “Hamilton Entry PEET-S” or “Hamilton Validator PEET-V”. Provide a clear description of the device (e.g. Cashier Booth Left Entry). Note: The Lane Number specified here is what we will use when configuring the PEET. The lane number is the first digit of any ticket pulled from a PEET device. For example, if your lane number is “3”, tickets from the Hamilton device will be 3,000,000-3,999,999.Program PEET with HandheldUnlock PEET using wrench
Configuring the PEET
Configuring a PEET is pretty straight-forward. To begin, you’ll need to connect your Hamilton Programming Device to the controller inside the PEET. Once you have connected your programming device, hit the “ESC” key to bring up the main menu.
Configuring Network Settings
Via the Main Menu, press F1 to access the NETWORK section and follow the below steps:
Navigate to LAN
DHCP* – Set to “Disabled”
Controller IP Addr – Set IP Address of PEET device
Edit Gateway Addr – Set Gateway IP Address
Edit DNS Addr – Set DNS Address (if needed)
Edit Network Mask – Set Subnet Mask IP Address (typically 255.255.255.0)
Navigate to NIM IP and set to NIM’s IP Address
Configuring Device Settings
Via the Main Menu, press F2 to access the CONFIGURE section and follow the below steps:
Navigate to Kiosk
Lane Number – Set Lane Number (should match lane number in netPark)
Ticket Number – For a new device, set this to 0. If you are reconfiguring an existing device this should be set to the last issued ticket number for this lane
Date & Time – Set the “Timezone” option to the timezone of the location
Navigate to H/W Options
Barcode – Enable to accept barcodes
Keycard
Set Keycard – Set to enabled if using RFID cards
HID Configuration
Set Facility Code – Set to the facility ID on the prox cards, if you do not know or are using multiple types of cards, set to 0
Button – Set to enabled to issue tickets
Navigate to Loop Options
Set Loop Mode – Set the loop mode of the device to one of the following:
1-Loop Presence – Event is complete when the device loop turns on and off
1-Loop Safety – Event is complete when the gate loop turns on and off
2-Loops Far – Event is complete when the device and gate loops turn on and off with a small delay between each
2-Loops Close – Event is complete when the device and gate loops turn on and off with no delay between each (DEFAULT)
* We recommend disabling DHCP to make it easier to troubleshoot devices. A static IP address is not necessary.
Finalizing Configuration
In all configuration cases, a reboot of the PEET device is recommended.
Carrida Plate-i ALPR Camera Configuration Camera Information The CARRIDA Plate-i ALPR Camera is an affordable, standalone solution for automatic license plate recognition (ALPR), designed to support credentialed entry and audit applications. Equipped with a 4K Sony image sensor and on-sensor ALPR decoding, it ensures fast and efficient license plate recognition directly on the camera. With plug-and-play capability and PoE+ support for both power and data, it’s easy to integrate into existing systems. Built to withstand harsh environments, the camera boasts an IP66 (IK10) waterproof rating and offers a manual zoom range from 1 to 7 meters (3 feet to 23 feet) for versatile installation. Technical…
How To Maintain Stalls Maintaining Stalls inside of netPark is an easy and hassle-free process that allows you to assign stalls to customers to keep them parking at the same spot over and over again. Our Stall feature is built to be integrated with our recurring system so that you can ensure a recurring customer always has a spot. Using our Stall feature will allow you to be able to see when a recurring parker is on the lot when they are off the lot, and when you have available spacing directly from our Stall Maintenance screen or on the Dashboard using our Stall…
netPark Validation Scanner The netPark Validation Scanner is a customer facing scanning application that allows customers to self-validate their parking via an Android scanner terminal. The customers can scan their tickets directly, as well as email and/or text themselves validations if configured to allow it. Installing the Validation Scanner App Installation of the Validation App is extremely simple and is done during the initial setup of the Android Scanner device. You will be provided with a Provisioning Setup Document for your scanners prior to onboarding and that document will contain 3 different QR Codes: Provisioning QR Code Scanner SNAPI Setup Barcode Validator Configuration…
How to Configure & Use the eSignature Module The eSignature Module is an optional enhancement to the Recurring Customer Module, designed to streamline recurring contract management. With this feature, clients can generate contracts for recurring services and provide them to their customers for digital signatures directly through Customer Loyalty Module on the client's website. All signed contracts are securely stored within netPark, allowing for easy retrieval at any time for record-keeping purposes. The system also tracks contract versions, storing them based on the last edit date. Additionally, customers can be automatically notified when a new version of the contract is created, helping to ensure they stay in compliance…
Inventory Signage Setup & Information Facilities may want the ability to monitor their inventory in real-time and relay it to their customers for informational purposes. That is where Digital Inventory Signage comes into play. Digital Inventory Signage allows netPark to communicate with specific digital signage to display inventory counts or if requested, an "Open" message until the Inventory hit's a specific threshold and then netPark will begin showing specific inventory numbers. The inventory is auto calculated based on the "Automated Count" of the lot, which is based on Loop Activation, allowing for what should be a more real-time inventory total, even if stale tickets exist…
Contact us!
Phone Hours (833) 638-7275 Monday – Friday: 10AM to 6PM EST Emergency Support – 24/7 for business critical functions
Contact Us Please use this form to contact us with any non-emergency comments, problems or inquiries. Be sure to provide details. If this is an emergency or requires immediate assistance, please call netPark Emergency Support.