Category: Maintenance

User Roles and Permissions

This article shows and explains the different permissions in each group You need to be able to be able to limit permissions of some users. Not every user should have access to everything in the system.  How to edit permissions: 1. Click Maintenance 2. Click Users 3. Select the User to add to a group or select Groups 4. Once in the User account you can select the drop down and choose the group you want to apply  Note: If you want you can choose entire groups ex: Manager, Administrator. Or you can choose individual permissions in each section. Different permission types: Security Permissions Here you will see a list of user groups. You select a premade group so it auto assigns them the permissions that come with that group. General Permissions This is where you can allow users to get permissions for Customers,

Read More »

Creating and Editing User Groups and Roles

This article will describe user groups and what permissions each comes with. It is important to have different types of accounts so that you can separate roles. There are some actions or reports you may not want an entry level or standard level employee to have access to. You can do this my setting different permission levels to different groups.  When a user is put into a group they get the permissions that are set to that group. To learn more about permissions click here. In order to edit groups: 1. Click Maintenance 2. Click Users 3. Click Groups 4. Click on a group to edit the permissions that come with that group or click on the green “New Group” button near the top right of the screen Suggested role types are:   Managers Administrators Accounting Cashiers Valet Custom Defining Roles:Administrator – This is the highest level of

Read More »
Modifying Reservation Rates
Maintenance

Modifying Reservation Rates

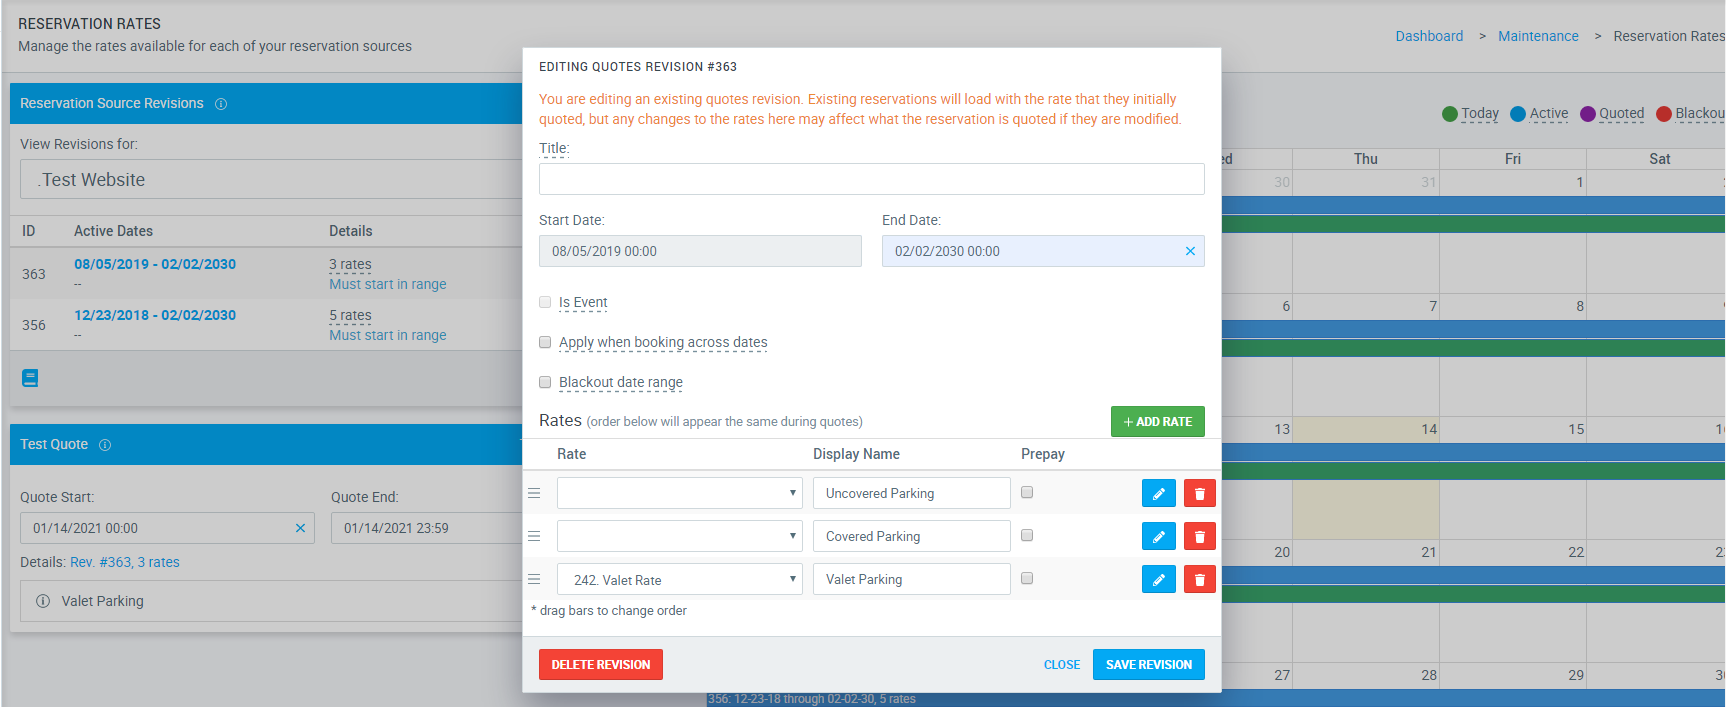
– If a rate for your website or a third party website needs to be changed, you will make the change in the same place that Reservation Rates are created. To learn how to create a new Reservation Rate revision, click here.  – Revisions are rates and date spans that are set up by the location.  1. From the dashboard click on Maintenance-> Reservation Rates. 2. Select the source that needs the change made. 3. Click on the blue pencil to bring up the “editing quotes revision” pop-up 4. Within this pop-up users will be able to change the rate, display name and whether or not it is pre-pay.  5. If you want to delete just a single rate from a revision, click on the red trashcan.  6. If you want to change the rate, display name, change the pre-pay and add notes, click on

Read More »

UVG Validations

The Unique Voucher Generator or UVG, allows users to create special vouchers within netPark Creating A New Voucher Group 1. Click Maintenance 2. Click Unique Voucher Generator 2. Click the “New Voucher Group” Button in the top right of the screen These vouchers are one time use and can be used to: Apply a Coupon Apply a Discount Validate parking Create a Groupon Vouchers are redeemed via the Close Ticket Screen Note: when printing, make sure that there isn’t any sort of setting that is attempting to scale or “fit” the PDF. This can cause alignment issues when printing to the cards UVG Breakdown Voucher Codes – These codes are 12 digits. Some may need leading 0’s added. Search Field – users can search for specific vouchers by voucher details Display Selector – users can select how many vouchers they want displayed per page in the results Voucher Search Details – users

Read More »

Understanding Services

Services can be any sort of extra service a location may offer. These can include oil changes, car washes or gas, just to name a few How to add a new Service 1. Click Maintenance 2. Click Services 3. Click New Service Services are separated into 5 different classes. Classes are used to group services together and allow for quick the quick look up ofservices based on the class which they fall under.  The classes are: Wash, Oil, Gas, Detail, and Misc Services Search  Search Field – This field allows users to search for services based on their name # of Results Picker – User can select the number of results to display per page Search Tabs – User can filter the results by: All, Detail, Gas, Oil, Wash Misc Include Disabled – Checking this box allows disabled services to be returned in search results Services List – This link takes

Read More »

Reservation Rates (New)

What is Reservation Rates Maintenance for? Reservation Rates allow you to set up rates for the following:  Your ecommerce Website or netPark Internal Reservations – setting a rate on Reservation Rate Maintenance page will take effect immediately and there is nothing else you need to do besides save your updates. Third Party Reservation Sources (Res Aggregators) – It is important to know that setting rates on Reservation Rate Maintenance  does not set the rates for all of the 3rd party  reservation aggregators. Many 3rd party sites do not use netPark’s full API when providing quote on their website.  In these cases, when you set up a rate on Reservation Rates Maintenance page, you are matching the rates you have set at the 3rd party site so that netPark knows what the rate is supposed to be when it arrives from the 3rd party aggregator.  If

Read More »

Prepaid Accounts and Cards

This article gives a brief overview of the Prepaid screens and how to setup prepaid accounts & cards. Prepaid Cards are pre-purchased blocks of days for future use on tickets. Prepaid Account Screen How to use the Prepaid Account Screen: Click Register>Gift Cards and Prepaid Accounts How to Load a Prepaid Account: When clicking on the load action, you will be taken to a new screen that will allow inventory to be added to an account. In order to create new inventory for a prepaid account, users will need to go to Maintenance, then Prepaid Inventory Maintenance. Users will be able to enable and disable inventory in this section. Creating a New Prepaid Account To create a new account, click Register>Gift Cards and Prepaid Accounts>Add Account  Blue fields are the only required fields that must be filled in. It is suggested to fill out as much information as you can. You can click Dismiss to delete

Read More »

Gift Card Management

This article gives a brief overview of the gift card screens and how to setup gift cards. They are pre-purchased dollars for future use on tickets. Gift Cards In the Gift Cards screen, users can see a list of all gift cards in the system. Users can get a log or export a log of all prepaid cards by clicking on the blue Gift Card Log or Export Results. Users can also get information of a single user and perform various tasks by clicking the green “Actions” button.. Gift Cards Maintenance Screen   If you do not have a Gift Card option please contact support@netpark.us for further assistance. 1. Click Register 2. Click on Gift Card & Prepaid Accounts 3. You can load, refund, and credit gift cards that are already in the system 4. You can also add a new one by clicking New Gift

Read More »

Lot Full Maintenance & Inventory

                                                                                           Lot Full Maint aka Lot Full Maintenance The Lot Full Maintenance Screen allows users to configure a self-park locations maximum inventory for weekdays and weekends How to get to the Lot Full Maintenance screen: 1. Click on Maintenance 2. Next, click on the Lot Full Maintenance aka Lot Full Maint button  3. Select your Lot Status 4. Select the dates you need to be open or closed 5. Fill in the number of spaces you have available and the Override information as well The Lot Full Maintenance Screen allows users to remotely monitor a self-park location. These settings can

Read More »

Inventory Screen

What is the Inventory Screen? The Inventory Screen is used to keep track of the the locations tickets and will show opened & closed tickets. As seen below, the inventory screen gives users different information on tickets with different parameters and actions that can be performed. How to use the Inventory Screen The Inventory screen is simple and easy to navigate. Users will be able to search for tickets in the search bar of the inventory screen. This search can be narrowed down to different parameters, the green buttons listed as: Search Only By, Choose Filter & Limit to Parking Zone. These are simply means to make searching more precise and are not necessary for the screen to function. There are also four check-boxes, Email, Reservation, Notes & Car Requested. Within the search are three actions that users can do, Close, Edit & Locate. Each

Read More »

Contact us!

Phone Hours
(833) 638-7275
Monday – Friday: 10AM to 6PM EST
Emergency Support – 24/7 for business critical functions

Contact Us
Please use this form to contact us with any non-emergency comments, problems or inquiries. Be sure to provide details. If this is an emergency or requires immediate assistance, please call netPark Emergency Support.